
Dr Mohaimen Al-Zubaidy MBBS BSC (Hons)
Newcastle University Healthcare Trust
Learning Objectives
- Understanding the value of using a direct ophthalmoscope
- To be able to recall the parts and settings of the direct ophthalmoscope
- Learning how to correctly carry out a fundoscopic examination using the direct ophthalmoscope
- To be able to identify key anatomical structures visible with the direct ophthalmoscope
Understanding the value of the direct ophthalmoscope
The retina is one of the few parts of the central nervous system observable from the exterior. Moreover, the fundus is one of the only regions where vasculature can be examined. The direct ophthalmoscope enables the user to screen the wellbeing of the retina, optic nerve, vasculature and vitreous humour, with the examination generating an upright image of 10-15 times magnification. Fundoscopic examination can identify pathological processes otherwise invisible, examples are plentiful, and include recognizing disseminated candidemia, cytomegalovirus in an immunocompromised patient, infective endocarditis, and being a useful tool in staging the degree of both diabetes and hypertension. The direct ophthalmoscope is an important instrument for fundoscopic examination especially in non-ophthalmic settings.
To be able to recall the parts and settings of the direct ophthalmoscope
The direct ophthalmoscope is a versatile tool containing a handle with a rechargeable battery and a head, frequently detachable, that contains a bulb, a set of apertures for the light source, and a set of lenses. Knowing the different parts of this instrument is the first step in being able to use it correctly (Fig 1).

Apertures
The direct ophthalmoscope has different apertures which can be modified to suit the level of dilation of the patient’s pupil. The aperture correlates to the size of the light beam. The micro and small aperture are used for the viewing of the fundus in small undiluted pupils whilst the larger aperture setting is used for viewing of the fundus through a dilated pupil and for general examination of the eye. Medium aperture is the standard setting for a non-dilated pupil in a dark room.
The slit aperture can also be helpful in assessing any contour abnormalities of the cornea, lens and retina.
Filters
Light filters also offer great utility when examining the eye in direct ophthalmoscopy. A cobalt blue filter can be used to look for corneal ulcers or abrasions in conjunction with fluorescein dye. Whilst a red-free filter is used to examine the macula and microvasculature in more detail by improving the contrast.
Learning how to correctly carry out a fundoscopic examination using the direct ophthalmoscope
Below is the step by step method used to correctly carry out fundoscopy:
- It is important to first wash your hands and don the correct personal protective equipment. Next introduce yourself to the patient and explain the examination you are going to carry out.
- Position the patient so that the ophthalmoscope is held directly at the level of the patient’s eye and turn on the ophthalmoscope with the light set to the correct aperture.
- It is essential to darken the room for the examination to enable clearer visualisation of the retina.
- Ask the patient to fixate on a target behind you for the duration of the examination.
- Direct the ophthalmoscope 15 degrees from centre and look for the red reflex at a distance of approximately one arm’s length from the eye. Simply follow the red reflex in until you see the retina. If you lose the red reflex, come back until you find it again and repeat.
- Observe for a red reflection in each pupil, caused by light reflecting back from the vascularised retina. Absence of this reflex and presence of leukocoria may suggest underlying pathology such as cataracts, vitreous haemorrhage or retinal detachment. In children this may be a sign of retinoblastoma.
- If you are assessing the patient’s right eye, you should hold the instrument in the same hand as the eye you are examining. Place the hand not holding the ophthalmoscope onto the patient’s forehead to prevent accidental collision between yours and the patient’s face.
- Approaching from a 45-degree angle slightly temporal to the patient, move closer whilst maintaining the red reflex.
- Begin by identifying a blood vessel and then follow the branching of this blood vessel towards the optic disc (the branches point like arrows towards the optic disc). Move in closer, staying nasally until you see the optic nerve. Rotate the dioptre lens until the optic nerve comes into focus.
- Once you identify the optic disc assess its characteristics including the contour, colour and the cup.
- Methodically assess each quadrant of the retina and the associated vascular arcades in a clockwise or anticlockwise fashion. Assessing the superior temporal, Superior nasal, Inferior nasal and Inferior temporal segments.
- Finally, inspect the macula and fovea by asking the patient to briefly look directly into the light of the ophthalmoscope. The macula is found lateral (temporal) to the optic nerve head and is yellow in colour.
- Repeat the assessment in the fellow eye approaching the patient from the opposite site holding the ophthalmoscope in the contralateral hand
- Thank the patient for their cooperation and document your examination findings.
To be able to identify key anatomical structures visible with the direct ophthalmoscope
In order to gain maximum utility from using a direct ophthalmoscope it is essential to understand the underlying fundal anatomy and becoming familiar with what is normal. The key structures are the underlying vasculature, optic cup and disc in addition to the macula and fovea. They are defined below on this image of a normal fundus.
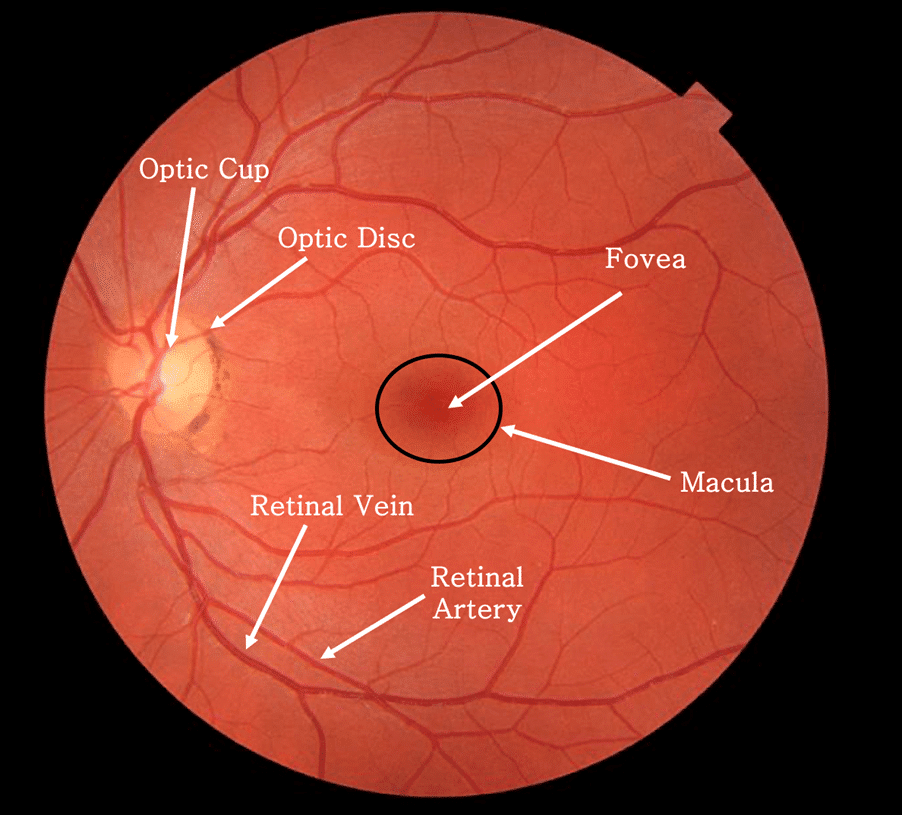
A normal retina appears clear without haemorrhages, cotton wool spots or exudates. The cup to disc ratio is an important feature of examining any retina, this is taken as the diameter of the cup divided by the diameter of the optic disc, with a ratio of 0.3 generally being considered normal. Discrepancies in this value can suggest underlying pathology such as in papilloedema. The central part of the macula, the “fovea” is about the same diameter as the optic disc and appears darker than the rest of the macula due to the presence of an additional pigment.
Further reading:
- Gurney SP, Makanjuola T, Kutubi M, Parulekar M, Abbott J. How to use…the direct ophthalmoscope. Arch Dis Child Educ Pract Ed. 2018 Apr;103(2):102-109. doi: 10.1136/archdischild-2016-312378. Epub 2017 Sep 21. PMID: 28935833.
- Roberts E, Morgan R, King D, Clerkin L. Funduscopy: a forgotten art? Postgrad Med J 1999;75:282–284.
- Eifrig DE. A system for examining the ocular funclus. North Carolina Med J. 1983;44:631–33.
Good explanation. Thank you very much …
It’s really good. I learned alot thanks so much
Now I will be able to perform funduscopy