
Youstina Metry1
1Heartlands Hospital, Birmingham, UK.
Direct ophthalmoscopy (fundoscopy) is a technique to examine the back of the eye. It is referred to as direct because the retinal image formed is erect/upright (1,2). This type of examination magnifies the retinal image inspected by approximately 15 times (2,3). Direct ophthalmoscopy is an extremely useful tool for detecting retinal, vascular, optic disc and choroidal pathologies. Hence, it has been an important form of examination that is not only taught to trainees but also to undergraduate medical students.
Direct ophthalmoscopy has been proven to be an ophthalmologically time efficient mode of examination that is required also by multiple specialities e.g., GPs and medical team for initial assessment of any retinal changes prior to referral for ophthalmology review as a way of provisional diagnosis. It is also considered less expensive in comparison to other more complex ophthalmological instruments, e.g., a slit lamp. In comparison to indirect ophthalmoscopy, however, the downside of this tool is the loss of the stereopsis character through examining via one eye at a time.
Familiarisation with the ophthalmoscope is required to understand the examination technique.


It is important to note that the dioptre dial is used to adjust the lens power based on the prescription of either patient’s, examiner’s, or both, as will be explained below. The aperture dial controls the size of the light. And the filter switch is used to adjust the colour of the light to identify different pathologies.
After explaining to the patient regarding the examination aspects and obtaining consent, the following rule should be adhered to in order to maximise your efficiency in ophthalmoscopy examination (1,3):
- Apply mydriatic eye drops e.g., tropicamide 1% (if not contraindicated).
- Dim the light of the room.
- Ask the patient to the take off their prescription glasses.
- Ask them to look straight ahead.
- Examine right eye with your right eye while holding the ophthalmoscope with your right hand, and vice versa. This rule will be referred to as Right-Right-Right, Left-Left-Left.
Once you have established your rules you can begin your steps for examination (1,3,4).
STEP 1: General Inspection
Examine the area for any swelling, ptosis, erythema, skin changes or discharge.
STEP 2: Pupillary assessment
Perform a pupillary assessment looking for any asymmetry in size or shape. Pupillary reaction to light should be examined before using the mydriatic drops. Because these drops inhibit pupillary constriction to light.
Steps 3-7 are carried out using rule number 5 (Right-Right-Right, Left- Left-Left).
STEP 3: Fundal (red) reflex
From a 50 cm (0.5m) distance, assess the presence for fundal reflex. Fundal reflex is usually reddish-orange colour. It is a reflection of a healthy red coloured retina. Remember to adjust the dioptre dial to your prescription, or else, you will need to keep your glasses on.
STEP 4: Fundal examination
During a fundal examination, the examiner needs to be in a remarkably close proximity to the patient, resting their opposite hand on the patient’s
forehead. In this examination, the dioptre dial is adjusted to the net result of both the examiner’s and the patient’s prescriptions.
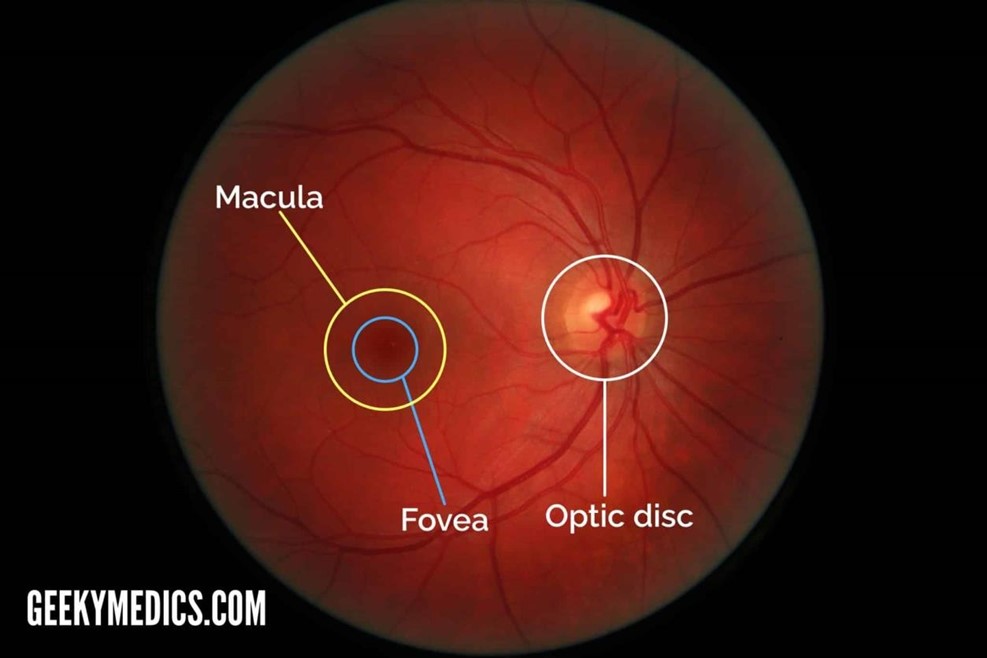
STEP 5: Optic Disc examination
During fundus examination, once a retinal vessel is identified, the vessel is tracked down towards nasal direction to assess the optic disc. Assessment of optic disc is comprised of 3 main aspects; disc contour, disc colour (normally pink at the rim and pale in the cup), and cup:disc ratio (usually=0.3)
STEP 6: Retinal vessels assessment
Once the optic disc assessment is complete, retinal vessels are assessed in all 4 quadrants for the presence of any microaneurysms, haemorrhages and neovascularisation.
Step 7: Macula assessment
Last but not least, ask the patient to look towards the light for a better view of the macula to evaluate any pathologies.
STEP 8: Examination of the Other eye
Steps 3-7 are repeated for the other eye examination.
Important information to explain to the patient:
It is essential, prior to the ophthalmoscopy examination, to inform the patient not to drive on the day of assessment as the vision will remain blurry for about 3-4 hours due to mydriatics application.
References
1- Ophthalmoscopy for Medical Students and Primary Care Physicians –
EyeWiki [Internet]. [cited 2023 Jan 27]. Available from:
https://eyewiki.aao.org/Ophthalmoscopy_for_Medical_Students_and_
Primary_Care_Physicians
2- Ophthalmoscopy. In: Wikipedia [Internet]. 2022 [cited 2023 Jan 27].
Available from:
https://en.wikipedia.org/w/index.php?title=Ophthalmoscopy&oldid=10
94327062
3- Moran CORE | How to Use the Direct Ophthalmoscope [Internet].
[cited 2023 Jan 31]. Available from: https://morancore.utah.edu/basicophthalmology-review/how-to-use-the-direct-ophthalmoscope/
4- Examination DAS. Fundoscopy (Ophthalmoscopy) – OSCE Guide |
Geeky Medics [Internet]. 2020 [cited 2023 Jan 27]. Available from:
https://geekymedics.com/fundoscopy-ophthalmoscopy-osce-guide/